Client-Go
Client-Go 有哪几种客户端?
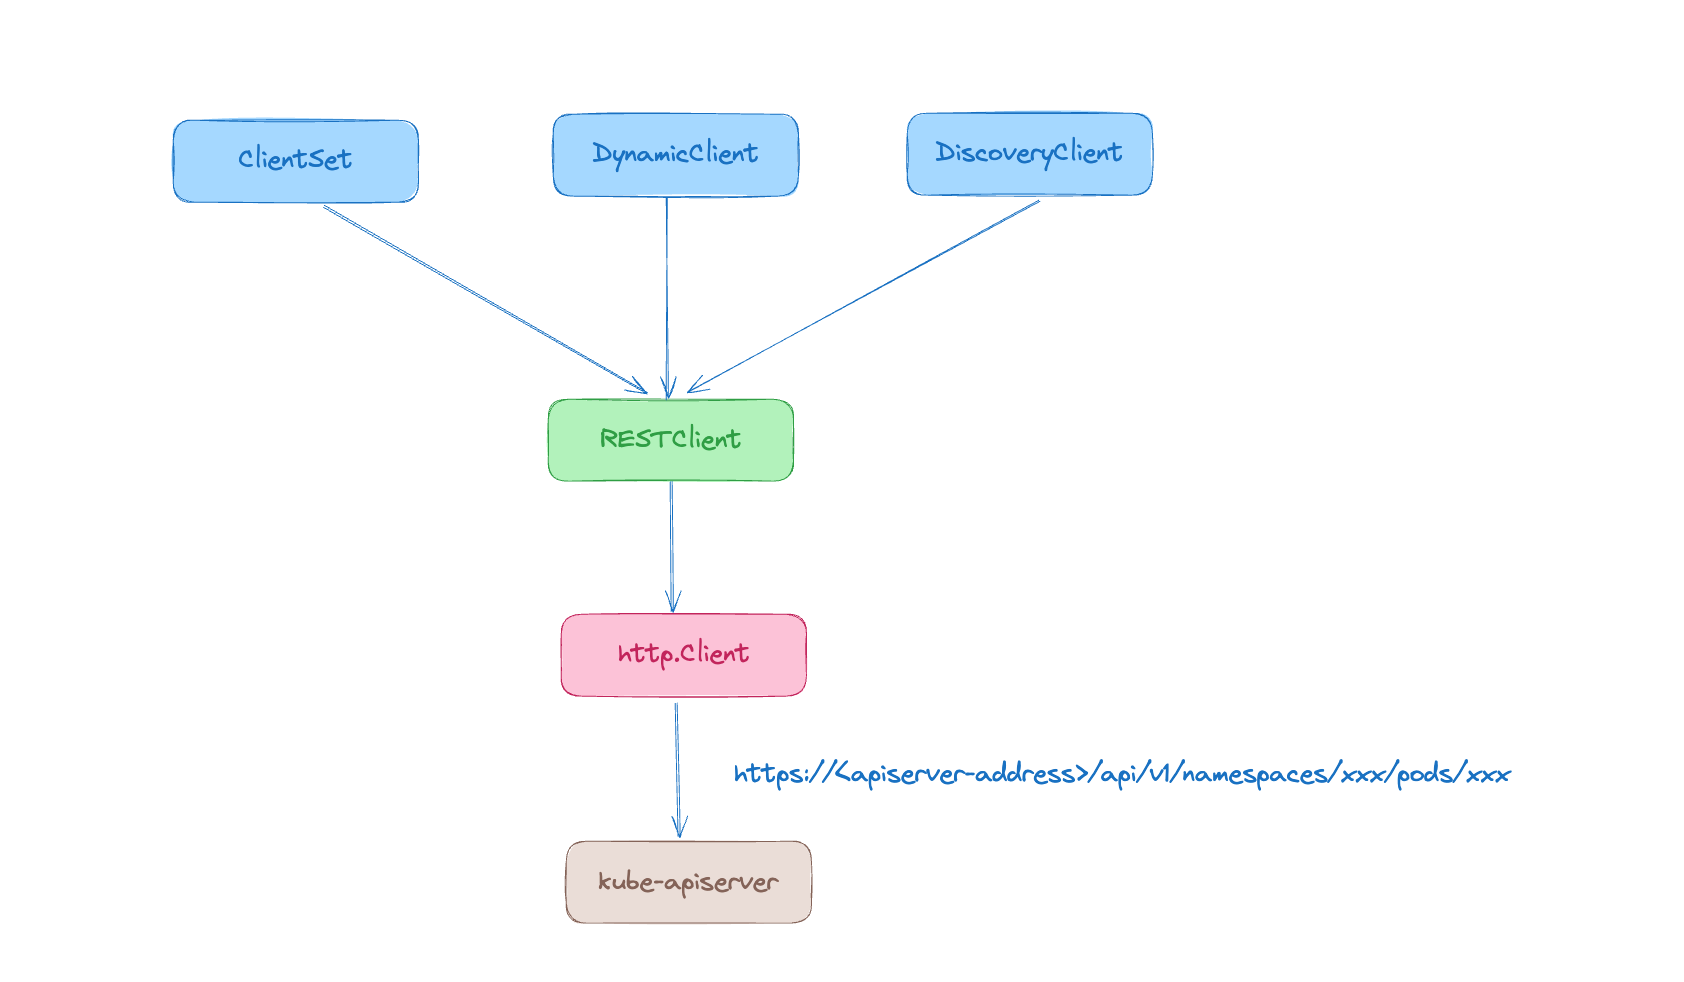
client-go 支持 4 种客户端对象与 kube-apiserver 进行交互:
- RESTClient 是最基础的客户端,它主要对 HTTP 请求进行了封装,实现了 RESTful 风格的 API。ClientSet、DynamicClient 和 DiscoveryClient 都是基于 RESTClient 实现的。
- ClientSet 在 RESTClient 的基础上封装了 Resource 和 Version 的管理方法。每一个 Resource 可以被视为一个客户端,而 ClientSet 则是多个客户端的集合,每一个 Resource 和 Version 都以函数的方式暴露给用户。ClientSet 只能处理 Kubernetes 内置资源,不能直接访问 CRD 资源。如果想用 ClientSet 访问 CRD 资源,则可以通过 client-gen 代码生成器重新生成 ClientSet,在 ClientSet 中自动生成与 CRD 操作相关的接口。
- DynamicClient 能够处理 Kubernetes 的所有资源,包括 Kubernetes 内置资源和 CRD 资源。
- DiscoveryClient 用于发现 kube-apiserver 所支持的 Group、Versions 和 Resources。
有关 client-go 使用示例的完整代码可以在这里找到:client-go
RESTClient 使用示例
// 配置 API 路径和请求的资源组/资源版本信息
config.APIPath = "/api"
config.GroupVersion = &corev1.SchemeGroupVersion

// 配置数据的编解码器
config.NegotiatedSerializer = scheme.Codecs

// 实例化 RESTClient 对象
restClient, err := rest.RESTClientFor(config)
if err != nil {
    panic(err)
}

// 预设返回值存放对象
result := &corev1.PodList{}

// Do 方法发起请求并用 Into 方法将 API Server 的返回结果写入 Result 对象中
err = restClient.Get().
    Namespace("default").
    Resource("pods").
    VersionedParams(&metav1.ListOptions{Limit: 500}, scheme.ParameterCodec).
    Do(context.Background()).
    Into(result)
ClientSet 使用示例
在 ClientSet 代码示例中,当使用 kubernetes.NewForConfig 函数初始化 ClientSet 客户端集合时,会级联构造出 CoreV1 资源组和资源版本的客户端集合对象(CoreV1Client)。 当使用 clientset.CoreV1().Pods 函数时会创建出 Pod 的专属客户端。
clientset, err := kubernetes.NewForConfig(config)
if err != nil {
    panic(err)
}

podClient := clientset.CoreV1().Pods(apiv1.NamespaceDefault)
list, err := podClient.List(context.TODO(), metav1.ListOptions{Limit: 500})
DynamicClient 使用示例
DynamicClient 之所以能够处理 CRD 资源,其关键在于 DynamicClient 内部实现了 Unstructured,用于处理非结构化数据(无法提前预知数据结构)。
dynamicClient, err := dynamic.NewForConfig(config)
if err != nil {
    panic(err)
}

gvr := schema.GroupVersionResource{Version: "v1", Resource: "pods"}
unstructObj, err := dynamicClient.Resource(gvr).Namespace("default").List(context.TODO(), metav1.ListOptions{Limit: 500})
if err != nil {
    panic(err)
}

list := &apiv1.PodList{}
err = runtime.DefaultUnstructuredConverter.FromUnstructured(unstructObj.UnstructuredContent(), list)
DiscoveryClient 使用示例
kubectl 命令行工具使用了 DiscoveryClient 的封装类 CachedDiscoveryClient,在第一次获取资源组、资源版本、资源信息时,会将响应缓存在本地磁盘,此后在缓存周期内再次获取资源信息时,会直接从本地缓存返回数据。CachedDiscoveryClient 的缓存信息默认存储在 ~/.kube/cache/discovery 和 ~/.kube/cache/http 目录中,默认缓存周期为 6 小时。
discoveryClient, err := discovery.NewDiscoveryClientForConfig(config)
if err != nil {
    panic(err)
}

_, APIResourceList, err := discoveryClient.ServerGroupsAndResources()
if err != nil {
    panic(err)
}

for _, list := range APIResourceList {
    gv, err := schema.ParseGroupVersion(list.GroupVersion)
    if err != nil {
        panic(err)
    }

    for _, resource := range list.APIResources {
        fmt.Printf("name: %v, group: %v, version: %v\n", resource.Name, gv.Group, gv.Version)
    }
}
参考资料:深入理解 Kubernetes 源码 P200 ~ P214
List 和 Watch 的实现原理
List-Watch 机制是 Kubernetes 的系统消息通知机制,该机制确保了消息的实时性、顺序性和可靠性。List 负责调用资源的 List RESTful API,基于 HTTP 短链接实现。
Watch 基于 HTTP 长链接实现,通过 HTTP/1.1 的分块传输编码(Chunked Transfer-Encoding)机制,在响应头中添加 Transfer-Encoding: chunked 字段,将数据分块传输给客户端。(在 HTTP2 中是基于 Server Push 实现的)
可以在访问 kube-apiserver 的 URL 后面添加 ?watch=true 参数,即可开启 Watch 监听。例如:
# 绕过凭证验证
kubectl proxy --port 8080
curl http://localhost:8080/api/v1/namespaces/default/pods?watch=true
参考资料
Informer 机制
Reflector 数据同步
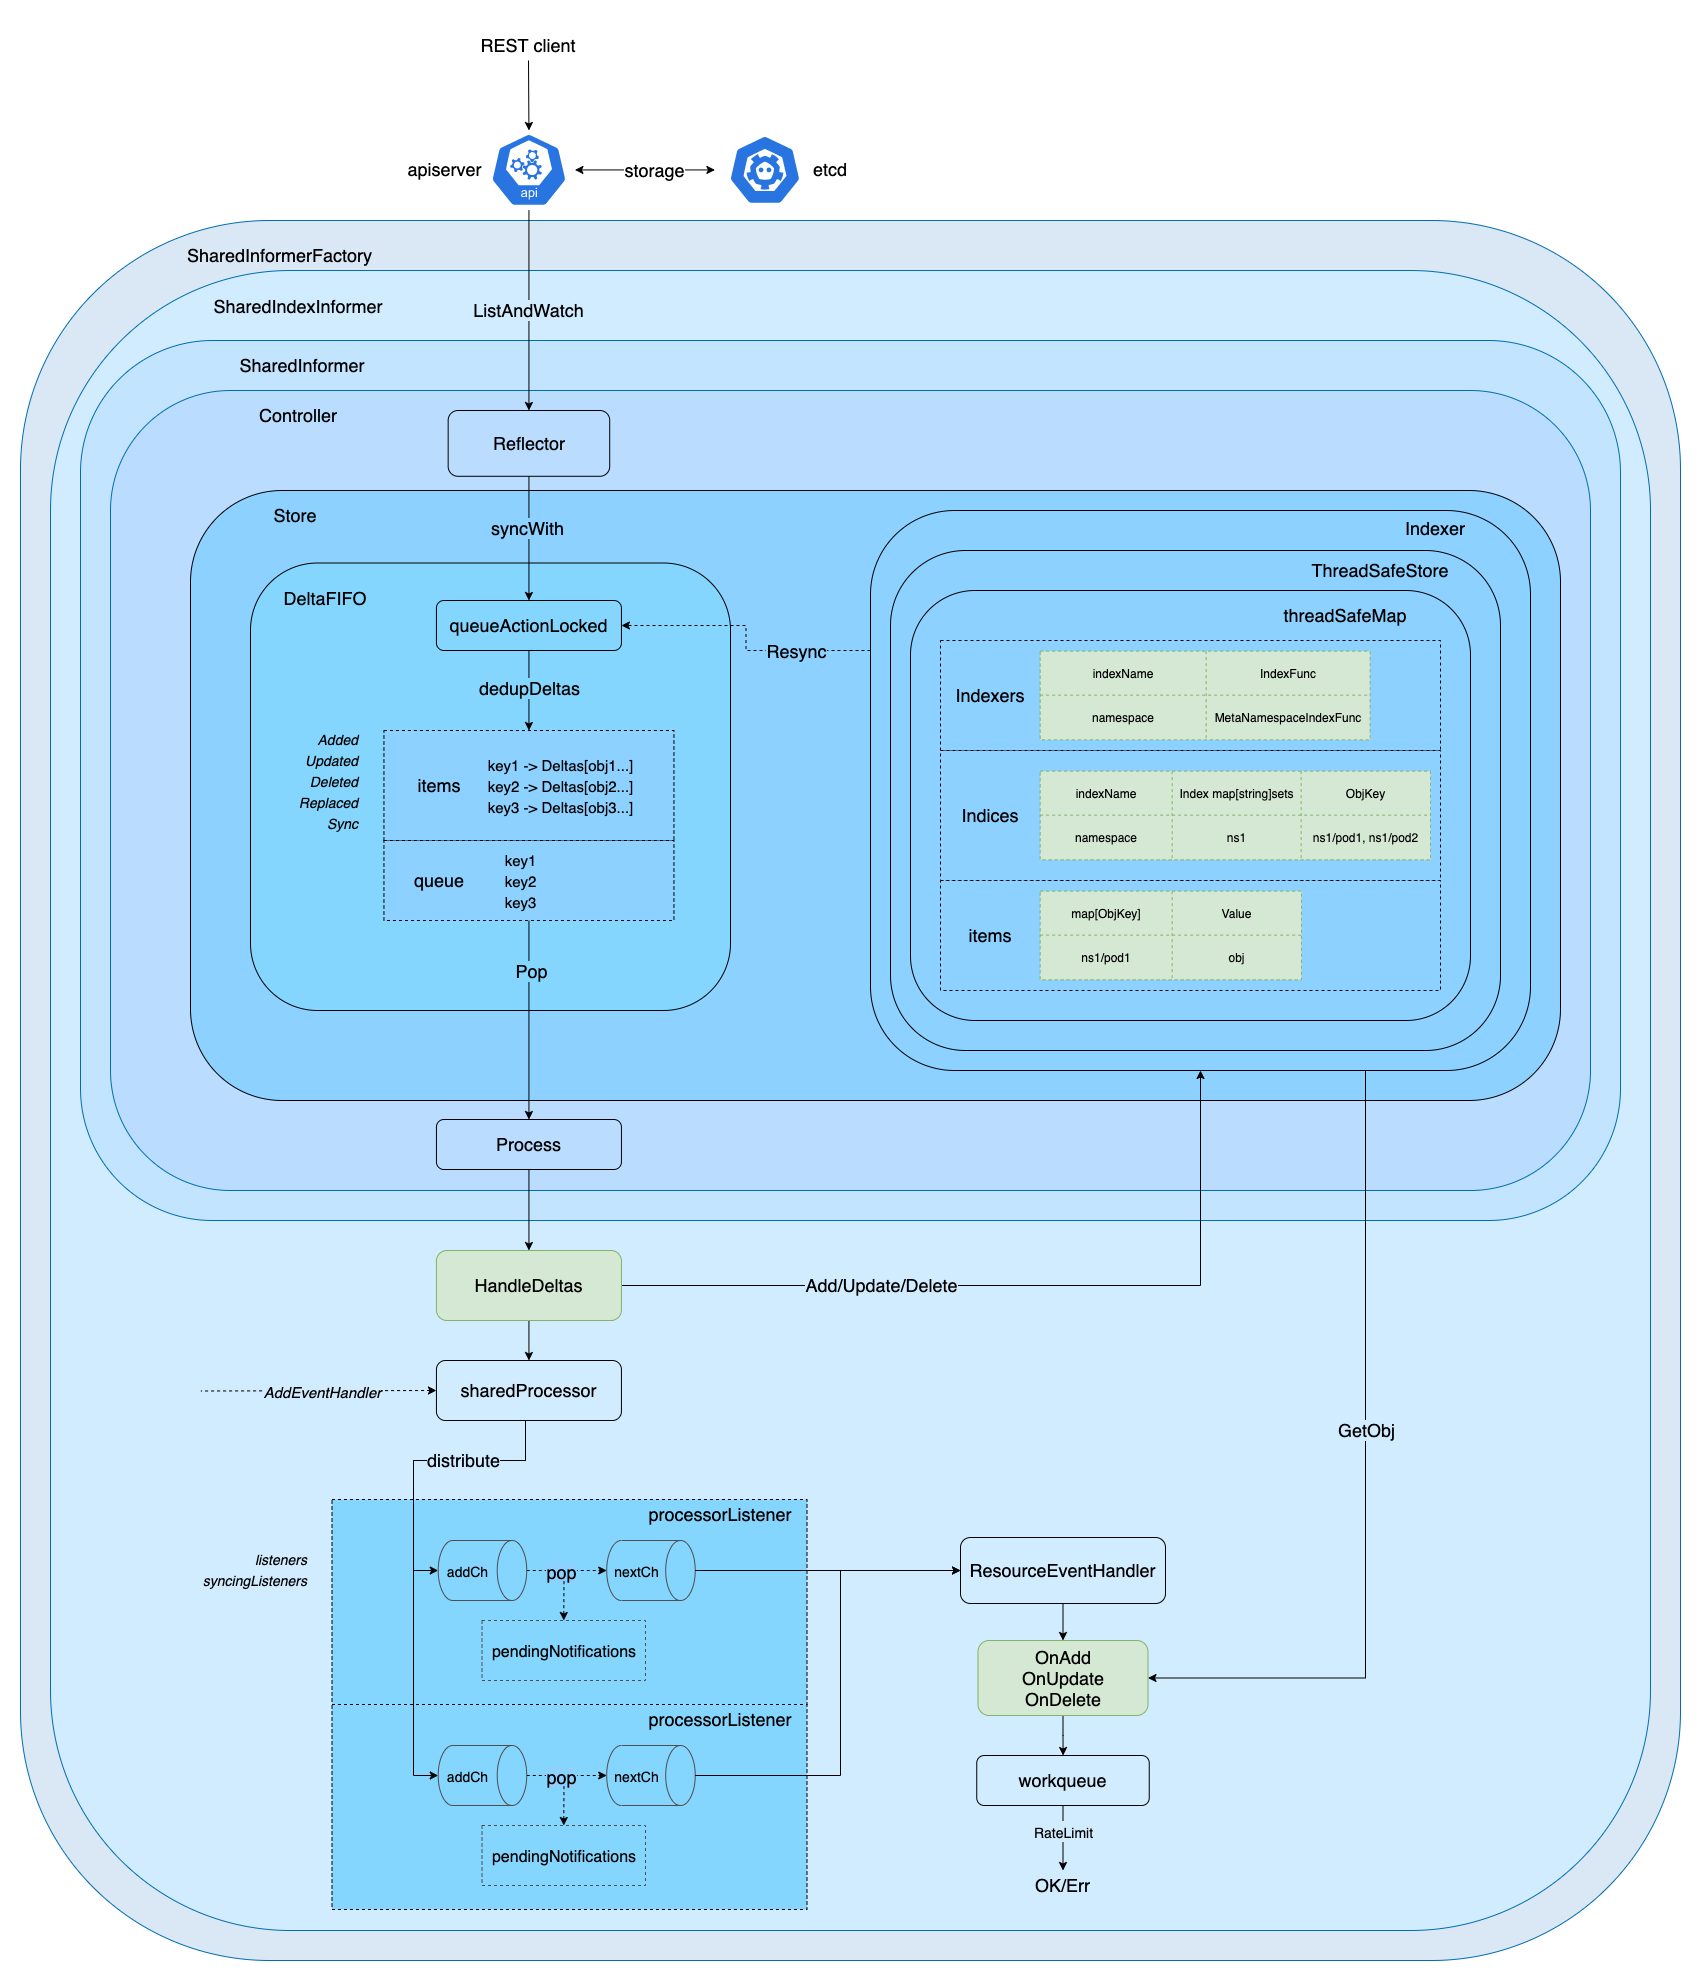
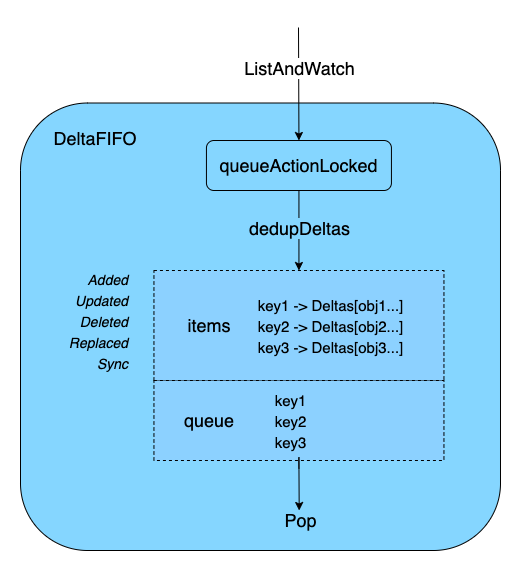
Reflector 的主要职责是从 kube-apiserver 拉取并持续监听(ListAndWatch) 相关资源类型的增删改 (Added/Updated/Deleted)事件,存储在由 DeltaFIFO 实现的本地缓存 (local store) 中,也就是 Indexer 中。
第一次拉取全量资源(目标资源类型))后通过 syncWith 函数全量替换(Replace) 到 DeltaFIFO 的 queue/items 中,之后通过持续监听 Watch(目标资源类型) 增量事件,并去重更新到 DeltaFIFO queue/items 中,等待被消费。
DeltaFIFO 操作队列
DeltaFIFO 在 Reflector 内部,它作为远端(API Server)和本地(Indexer、Listener)之间的传输桥梁。简单来说,它是一个生产者消费者队列,记录了资源对象的变化过程,拥有 FIFO 的特性,操作的资源对象为 Delta。每一个 Delta 包含一个操作类型和操作对象。
DeltaFIFO 使用示例
package main
import (
"k8s.io/client-go/tools/cache"
"k8s.io/klog/v2"
)
type pod struct {
Name string
Value float64
}
func newPod(name string, v float64) pod {
return pod{
Name: name,
Value: v,
}
}
func podKeyFunc(obj interface{}) (string, error) {
return obj.(pod).Name, nil
}
func main() {
// 可以自定义 KeyFunc,默认使用 MetaNamespaceKeyFunc 生成的结果(<namespace>/<name>)作为 DeltaFIFO 的 key
df := cache.NewDeltaFIFOWithOptions(cache.DeltaFIFOOptions{KeyFunction: podKeyFunc})
pod1 := newPod("pod1", 1)
pod2 := newPod("pod2", 2)
pod3 := newPod("pod3", 3)
df.Add(pod1)
df.Add(pod2)
df.Add(pod3)
pod1.Value = 1.1
df.Update(pod1)
df.Delete(pod1)
df.Pop(func(obj interface{}, isInInitialList bool) error {
for _, delta := range obj.(cache.Deltas) {
klog.Infof("delta type: %s, delta object: %s", delta.Type, delta.Object)
}
return nil
})
}
// 运行程序输出结果如下,只可以取到最新的对象 pod1,旧值需要去 Indexer 里取
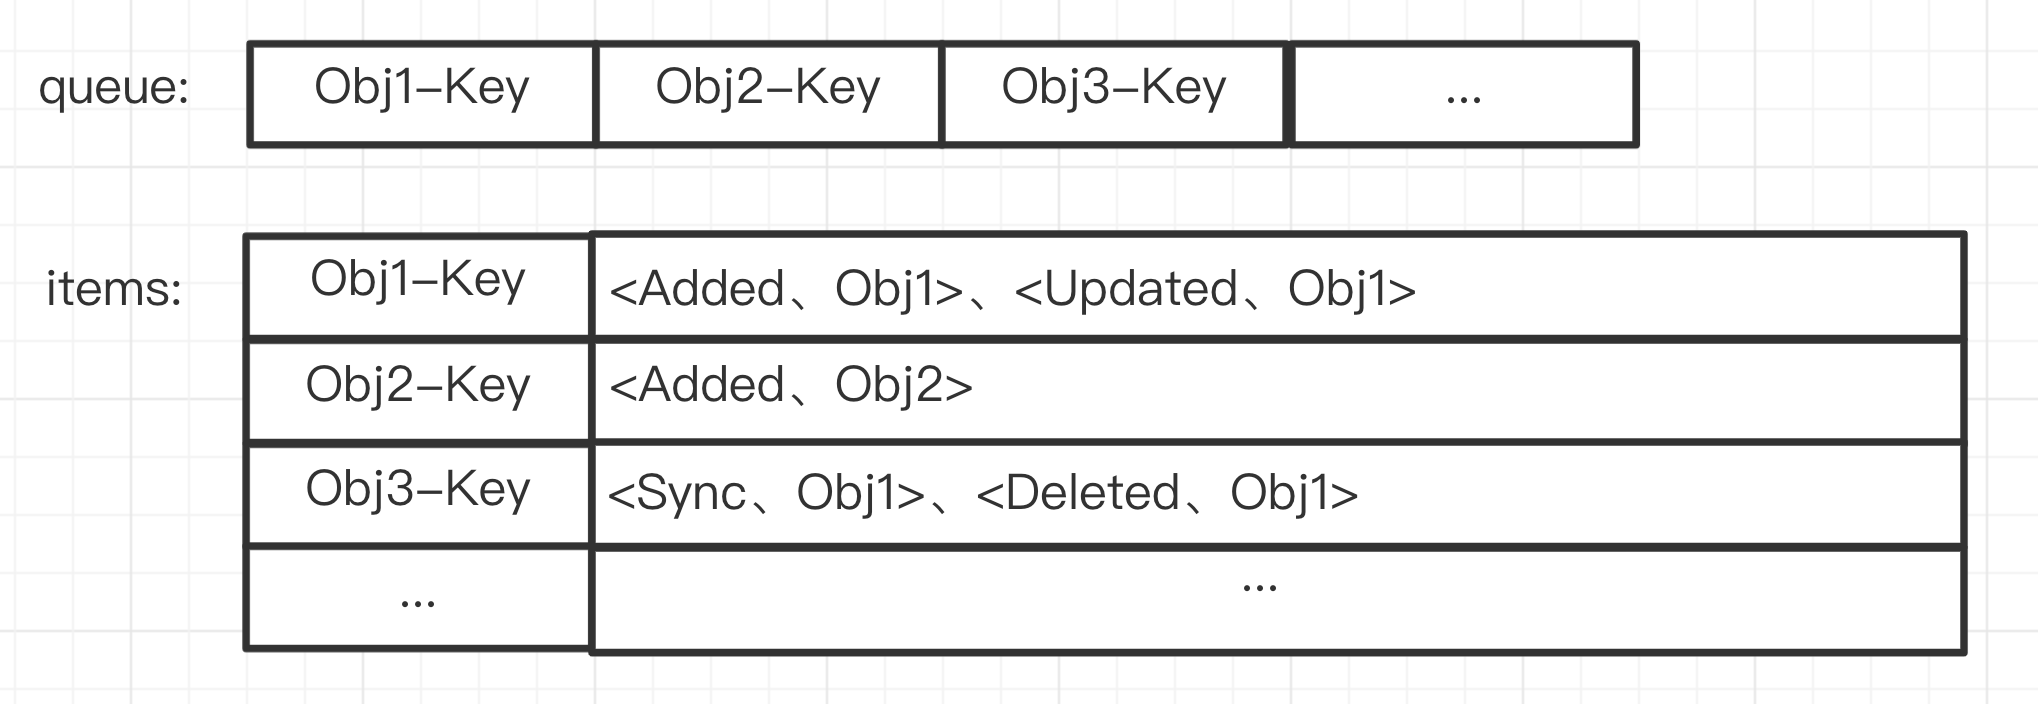
// I1012 12:03:54.863048 1437 deltafifo.go:38] delta type: Added, delta object: {pod1 %!s(float64=1)}
// I1012 12:03:54.863415 1437 deltafifo.go:38] delta type: Updated, delta object: {pod1 %!s(float64=1.1)}
// I1012 12:03:54.863429 1437 deltafifo.go:38] delta type: Deleted, delta object: {pod1 %!s(float64=1.1)}DeltaFIFO 结构
DeltaFIFO 结构中的主要字段如下:
items:用于存储资源对象的 Delta,key 为资源对象的 key,value 为 Delta。queue:用于存储资源对象的 key,保证资源对象的顺序。由于 map 是无序的,所以需要queue来保证资源对象的顺序。与items中的 key 一一对应(正常情况下queue与items数量不多不少,刚好对应)。keyFunc:生成资源对象的 key 的方法。默认使用MetaNamespaceKeyFunc方法,生成的 key 为namespace/name,如果资源对象没有 namespace,则 key 为name。KnownObjects:knownObjects 就是 Indexer,里面存有已知全部的对象。
type DeltaFIFO struct {
	// lock/cond protects access to 'items' and 'queue'.
	lock sync.RWMutex
	cond sync.Cond

	// `items` maps a key to a Deltas.
	// Each such Deltas has at least one Delta.
	items map[string]Deltas

	// `queue` maintains FIFO order of keys for consumption in Pop().
	// There are no duplicates in `queue`.
	// A key is in `queue` if and only if it is in `items`.
	queue []string

	// populated is true if the first batch of items inserted by Replace() has been populated
	// or Delete/Add/Update/AddIfNotPresent was called first.
	populated bool
	// initialPopulationCount is the number of items inserted by the first call of Replace()
	initialPopulationCount int

	// keyFunc is used to make the key used for queued item
	// insertion and retrieval, and should be deterministic.
	keyFunc KeyFunc

	// knownObjects list keys that are "known" --- affecting Delete(),
	// Replace(), and Resync()
	knownObjects KeyListerGetter

	// Used to indicate a queue is closed so a control loop can exit when a queue is empty.
	// Currently, not used to gate any of CRUD operations.
	closed bool

	// emitDeltaTypeReplaced is whether to emit the Replaced or Sync
	// DeltaType when Replace() is called (to preserve backwards compat).
	emitDeltaTypeReplaced bool

	// Called with every object if non-nil.
	transformer TransformFunc
}
每个 Delta 的结构如下,其中包含 Type(操作类型)和 Object(操作对象,例如 Pod)两个字段:
type Delta struct {
	Type   DeltaType
	Object interface{}
}
Type 的类型如下:
- Added :增加
- Updated:更新
- Deleted:删除
- Replaced:重新 list(relist),这个状态是由于 watch event 出错,导致需要进行 relist 来进行全盘同步。需要设置
EmitDeltaTypeReplaced=true才能显示这个状态,否为默认为 Sync。 - Sync:本地同步
const (
	Added   DeltaType = "Added"
	Updated DeltaType = "Updated"
	Deleted DeltaType = "Deleted"
	// Replaced is emitted when we encountered watch errors and had to do a
	// relist. We don't know if the replaced object has changed.
	//
	// NOTE: Previous versions of DeltaFIFO would use Sync for Replace events
	// as well. Hence, Replaced is only emitted when the option
	// EmitDeltaTypeReplaced is true.
	Replaced DeltaType = "Replaced"
	// Sync is for synthetic events during a periodic resync.
	Sync DeltaType = "Sync"
)
下面可视化 DeltaFIFO 中最主要的两个存储结构 queue 和 items。
DeltaFIFO 的职责是通过队列加锁处理(queueActionLocked)、去重(dedupDeltas)、存储在由 DeltaFIFO 实现的本地存储(Indexer) 中,包括 queue (仅存 objKeys) 和 items(存 objKeys 和对应的 Deltas 增量变化),并通过 Pop 不断消费,通过 Process(item)处理相关逻辑。
为什么使用 DeltaFIFO,而不是直接使用一个 FIFO?
最重要的就是合并请求。也就是在 queue 中的 key 被不断 Pop 处理的过程中,会有大量同一个 Obj 的请求到来,这些请求可能散布在整个请求流中,也即是不是连续的。比如下面的例子:在 7 次请求中,包含 4 次对 Obj1 的请求,请求顺序如下:1->20->1->1->3->5->1,如果直接使用 FIFO,那么在处理完第一个 Obj1 之后,需要处理 Obj20,之后又需要处理 Obj1 的请求,后续同理,这样对 Obj 1 重复多次做了处理,这不是我们希望的。所以在 DeltaFIFO 中,我们将这一时间段内对同一个 Obj 的请求都合并为 Deltas,每一次的请求作为其中的一个 Delta。这里的一段时间指的是这个 Obj 对应的 key 入队列 queue 开始到出队列的这段时间内。
参考资料:
Indexer 资源缓存
Indexer 是 client-go 用来存储资源对象并自带索引功能的本地存储,Reflector 从 DeltaFIFO 中将消费出来的资源对象存储至 Indexer。Indexer 中的数据与 etcd 集群中的数据保持完全一致。client-go 可以很方便地从本地存储中读取相应的资源对象数据,而无须每次都从远程 etcd 集群中读取,这样可以减轻 kube-apiserver 和 etcd 集群的压力。
Indexer 使用示例
Indexer 的使用示例如下:
package main

import (
	"fmt"

	v1 "k8s.io/api/core/v1"
	"k8s.io/apimachinery/pkg/api/meta"
	metav1 "k8s.io/apimachinery/pkg/apis/meta/v1"
	"k8s.io/client-go/tools/cache"
)

const (
	NamespaceIndexName = "namespace"
	NodeNameIndexName  = "nodeName"
)

func NamespaceIndexFunc(obj interface{}) ([]string, error) {
	m, err := meta.Accessor(obj)
	if err != nil {
		return []string{""}, fmt.Errorf("object has no meta: %v", err)
	}
	return []string{m.GetNamespace()}, nil
}

func NodeNameIndexFunc(obj interface{}) ([]string, error) {
	pod, ok := obj.(*v1.Pod)
	if !ok {
		return []string{}, nil
	}
	return []string{pod.Spec.NodeName}, nil
}

func main() {
	// 对象的 objKey 由 MetaNamespaceKeyFunc 函数生成
	// 另外自定义了两个 IndexFunc 的 NamespaceIndexFunc 和 NodeNameIndexFunc,分别根据资源对象的命名空间和节点名称生成索引值列表
	index := cache.NewIndexer(cache.MetaNamespaceKeyFunc, cache.Indexers{
		NamespaceIndexName: NamespaceIndexFunc,
		NodeNameIndexName:  NodeNameIndexFunc,
	})

	pod1 := &v1.Pod{
		ObjectMeta: metav1.ObjectMeta{
			Name:      "pod-1",
			Namespace: "default",
		},
		Spec: v1.PodSpec{NodeName: "node1"},
	}
	pod2 := &v1.Pod{
		ObjectMeta: metav1.ObjectMeta{
			Name:      "pod-2",
			Namespace: "default",
		},
		Spec: v1.PodSpec{NodeName: "node2"},
	}
	pod3 := &v1.Pod{
		ObjectMeta: metav1.ObjectMeta{
			Name:      "pod-3",
			Namespace: "kube-system",
		},
		Spec: v1.PodSpec{NodeName: "node2"},
	}

	_ = index.Add(pod1)
	_ = index.Add(pod2)
	_ = index.Add(pod3)

	// ByIndex 两个参数:IndexName(索引器名称)和 indexKey(需要检索的key)
	fmt.Println("=========== NamespaceIndexFunc ==============")
	pods, err := index.ByIndex(NamespaceIndexName, "default")
	if err != nil {
		panic(err)
	}
	for _, pod := range pods {
		fmt.Println(pod.(*v1.Pod).Name)
	}

	fmt.Println("=========== NodeNameIndexFunc ==============")
	pods, err = index.ByIndex(NodeNameIndexName, "node2")
	if err != nil {
		panic(err)
	}
	for _, pod := range pods {
		fmt.Println(pod.(*v1.Pod).Name)
	}

	fmt.Println("=========== MetaNamespaceKeyFunc ===============")
	// 直接通过 <namespace>/<name> 的 key 来获取对象
	obj, _, _ := index.GetByKey("default/pod-2")
	fmt.Println(obj.(*v1.Pod).Name)
}

// 输出结果为:
//=========== NamespaceIndexFunc ==============
//pod-1
//pod-2
//=========== NodeNameIndexFunc ==============
//pod-3
//pod-2
//=========== MetaNamespaceKeyFunc ===============
//pod-2
在上面的示例中首先通过 NewIndexer 函数实例化 Indexer 对象,第一个参数就是用于计算资源对象键的函数,这里我们使用的是 MetaNamespaceKeyFunc 这个默认的对象键函数;第二个参数是 Indexers,里面包含了我们自定义的两个 IndexFunc:NamespaceIndexFunc 与 NodeNameIndexFunc,一个根据资源对象的命名空间来进行索引,一个根据资源对象所在的节点进行索引。
然后定义了 3 个 Pod,前两个在 default 命名空间下面,另外一个在 kube-system 命名空间下面,然后通过 index.Add 函数添加这 3 个 Pod 资源对象。然后通过 index.ByIndex 函数查询在名为 namespace 的 Index 下面匹配 IndexedValue 为 default 的 Pod 列表。也就是查询 default 这个命名空间下面的所有 Pod,这里就是前两个定义的 Pod。
IndexFunc, Index, Indexers 和 Indices
Indexer 中有几个非常重要的概念:
// IndexFunc knows how to compute the set of indexed values for an object.
type IndexFunc func(obj interface{}) ([]string, error)

// Index maps the indexed value to a set of keys in the store that match on that value
type Index map[string]sets.String

// Indexers maps a name to an IndexFunc
type Indexers map[string]IndexFunc

// Indices maps a name to an Index
type Indices map[string]Index- IndexFunc 用于计算一个资源对象的索引值列表,上面示例是指定创建 "namespace" 和 "nodeName" 2 个索引,当然我们也可以根据需求定义其他的,比如根据 Label 标签、Annotation 等属性来生成索引值列表。
- Index 是实际的索引,key 是 indexedValue(在 "namespace" 索引中有两个 indexedValue:default, kube-system),value 是 objKey(默认使用 MetaNamespaceKeyFunc 函数计算,例如 default/pod-1, kube-system/pod-3) ,对于上面的示例,我们要查找某个命名空间下面的 Pod,那就要让 Pod 按照其命名空间进行索引,对应的 Index 类型就是 map[namespace]sets.pod。
- Indexers 用于查找 IndexFunc,key 为 indexName(例如 "namespace"),value 为 indexName 对应的 IndexFunc,上面的示例就是 map["namespace"]MetaNamespaceIndexFunc。
- Indices:用于查找 Index,key 为 indexName, value 为 indexName 对应的 Index,对于上面的示例就是 map["namespace"]map[namespace]sets.pod。
按照上面的理解我们可以得到上面示例的索引数据如下所示:
// Indexers 包含了所有的 IndexFunc
Indexers: {
  "namespace": NamespaceIndexFunc, // IndexFunc
  "nodeName": NodeNameIndexFunc, // IndexFunc
}
// Indices 包含了所有的 Index
Indices: {
 "namespace": {  // Index
  "default": ["pod-1", "pod-2"], // Index 中的一条记录,key 是 IndexedValue,value 是 objKey
  "kube-system": ["pod-3"]
 },
 "nodeName": {  // Index
  "node1": ["pod-1"],
  "node2": ["pod-2", "pod-3"]
 }
}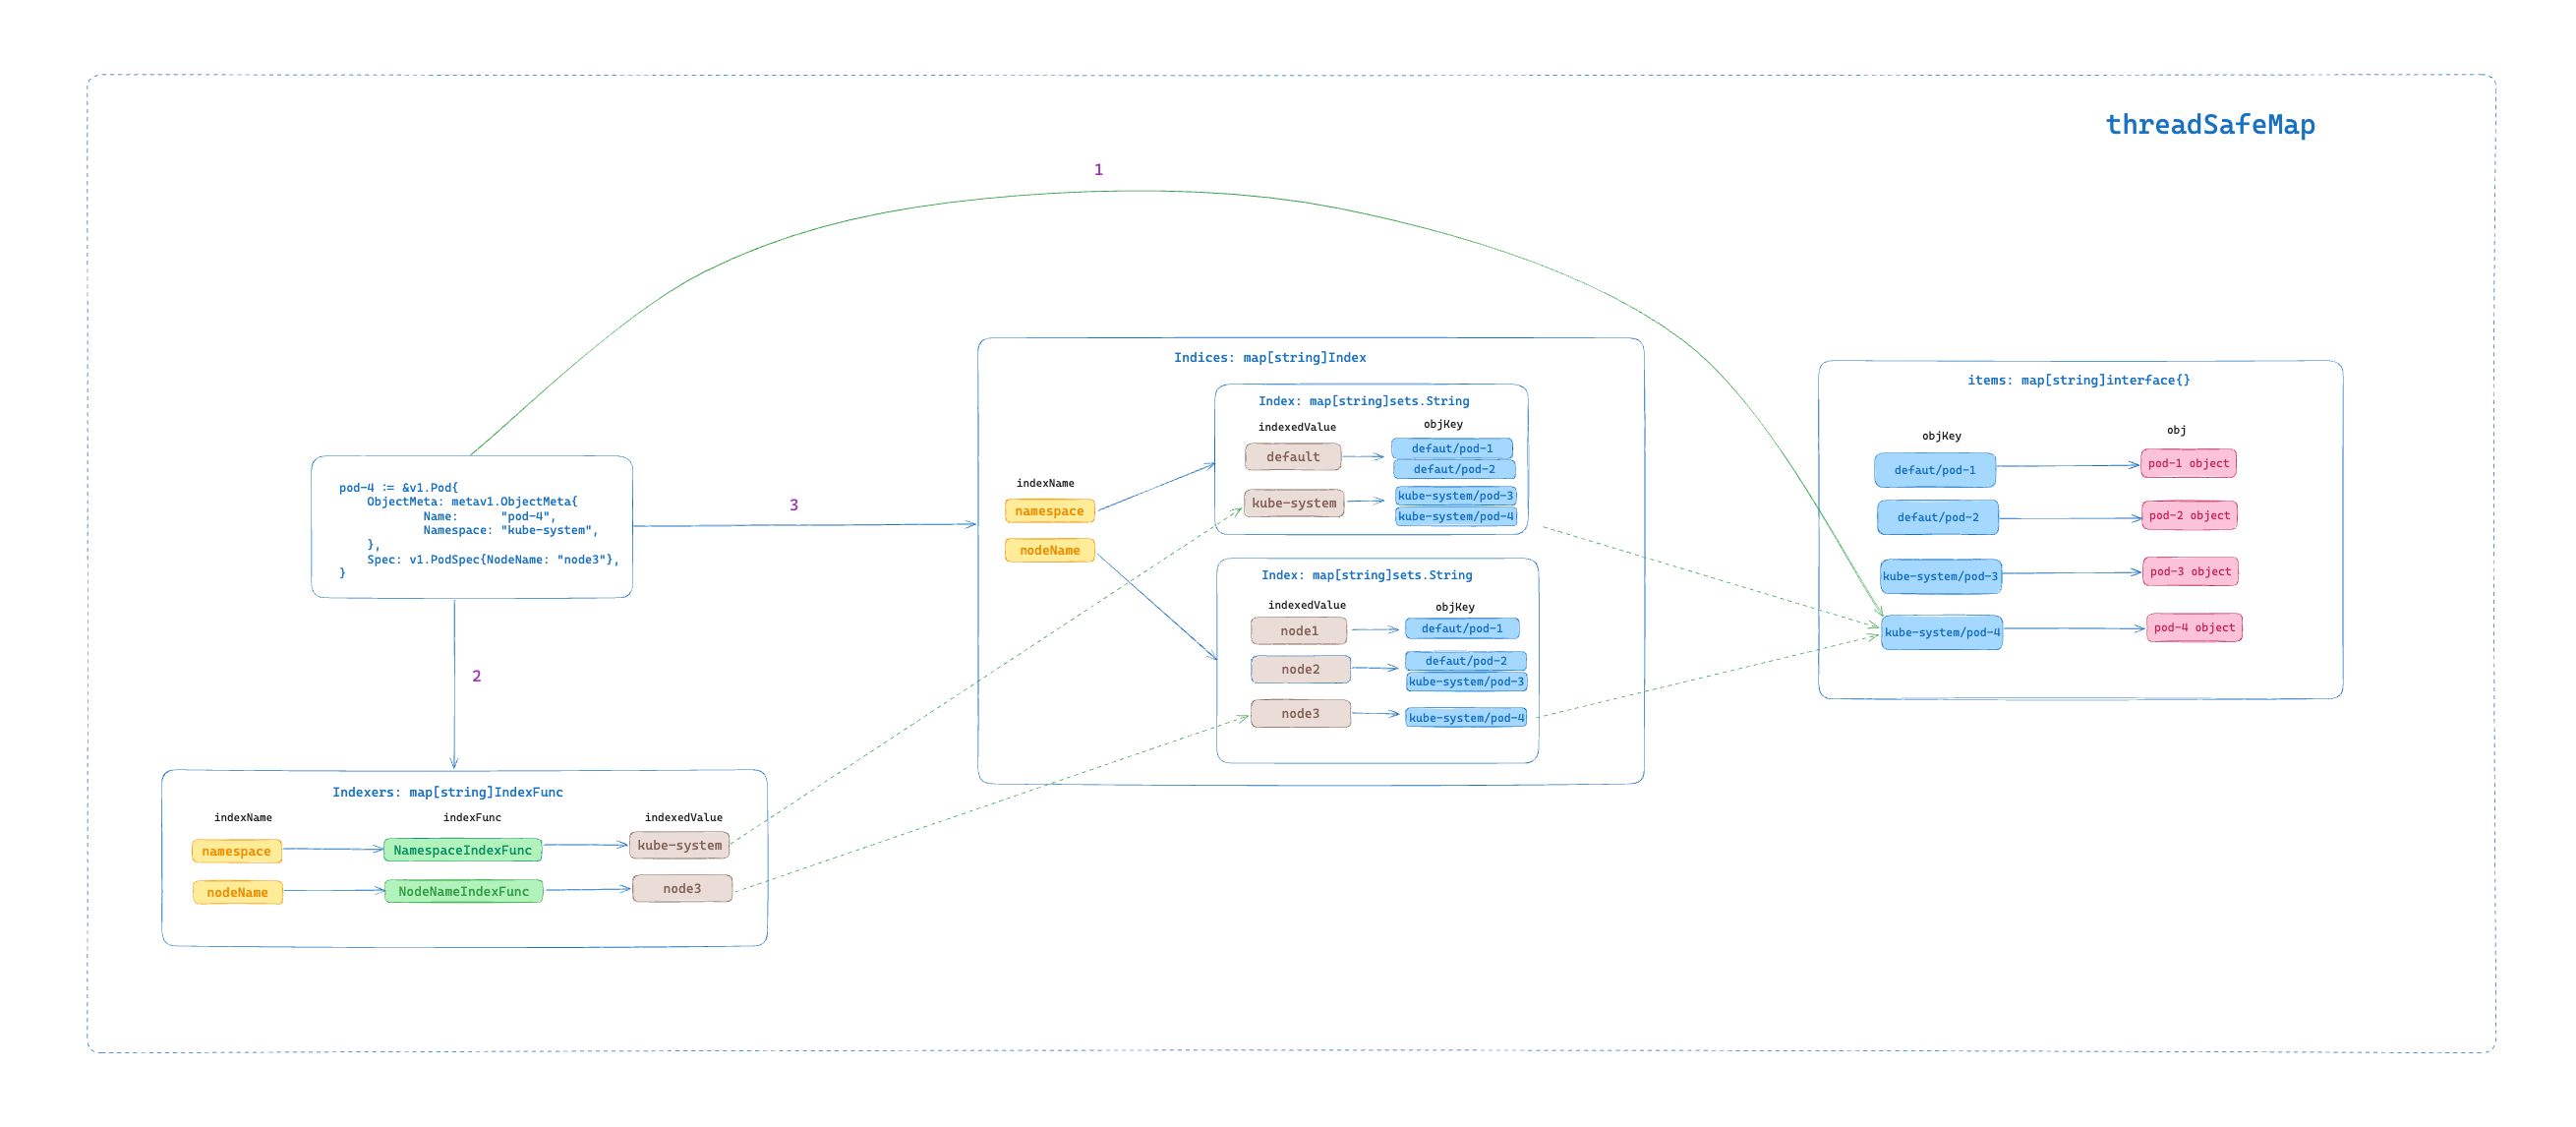
对于 Kubernetes 资源对象的新增操作来说,其建立索引并存储的过程如下:
- 1.将新增的对象存储到 threadSafeMap 的 items 中,key 是 对象的 objKey(默认使用 MetaNamespaceKeyFunc 函数计算),value 为对象本身。
- 2.遍历 Indexers 中的 indexFunc 列表,为新增的对象应用所有的 indexFunc 函数计算出不同 Index 下的 indexedValue。例如,假设我们设置了
NamespaceIndexFunc和NodeNameIndexFunc两个 indexFunc 函数,那么对于新增的 pod-4 对象,在 Indexnamespace下的 indexedValue 为default,在 IndexnodeName下的 indexedValue 为node-1。 - 3.根据 IndexName 在 Indices 中找到对应的 Index,将新增的对象 objKey 添加到 Index 中。
Indexer 接口实现
Indexer 定义了两方面的接口:
- 第一类为存储类型的接口
Store,包含了Add、Update、Delete、List、ListKeys、Get、GetByKey、Replace、Resync等数据存储、读取的常规操作。 - 第二类为索引类型的接口,(方法名中包含 Index)。
type Indexer interface {
	Store
	// Index returns the stored objects whose set of indexed values
	// intersects the set of indexed values of the given object, for
	// the named index
	Index(indexName string, obj interface{}) ([]interface{}, error)
	// IndexKeys returns the storage keys of the stored objects whose
	// set of indexed values for the named index includes the given
	// indexed value
	IndexKeys(indexName, indexedValue string) ([]string, error)
	// ListIndexFuncValues returns all the indexed values of the given index
	ListIndexFuncValues(indexName string) []string
	// ByIndex returns the stored objects whose set of indexed values
	// for the named index includes the given indexed value
	ByIndex(indexName, indexedValue string) ([]interface{}, error)
	// GetIndexers return the indexers
	GetIndexers() Indexers

	// AddIndexers adds more indexers to this store.  If you call this after you already have data
	// in the store, the results are undefined.
	AddIndexers(newIndexers Indexers) error
}
cache 实现了 Indexer 接口,内部定义了 ThreadSafeStore 接口类型的 cacheStorage,用来实现基于索引的本地存储。
// `*cache` implements Indexer in terms of a ThreadSafeStore and an
// associated KeyFunc.
type cache struct {
	// ThreadSafeStore由 threadSafeMap 实现
	cacheStorage ThreadSafeStore
	//默认使用 MetaNamespaceKeyFunc 也即是 key 为namespace/name
	keyFunc KeyFunc
}
ThreadSafeStore 接口定义了常规的存储、读取、更新接口,以及对于索引的一些接口。
type ThreadSafeStore interface {
	Add(key string, obj interface{})
	Update(key string, obj interface{})
	Delete(key string)
	Get(key string) (item interface{}, exists bool)
	List() []interface{}
	ListKeys() []string
	Replace(map[string]interface{}, string)
	Index(indexName string, obj interface{}) ([]interface{}, error)
	IndexKeys(indexName, indexedValue string) ([]string, error)
	ListIndexFuncValues(name string) []string
	ByIndex(indexName, indexedValue string) ([]interface{}, error)
	GetIndexers() Indexers

	// AddIndexers adds more indexers to this store. This supports adding indexes after the store already has items.
	AddIndexers(newIndexers Indexers) error
	// Resync is a no-op and is deprecated
	Resync() error
}
threadSafeMap 实现了 ThreadSafeStore 接口,此处为真正实现 local store (Indexer) 的地方,通过 items 来存储数据、indexers 来存储索引方法、indices 来存储索引,实现基于索引的存储。并实现了实现了 ThreadSafeStore 的所有接口。
// threadSafeMap implements ThreadSafeStore
type threadSafeMap struct {
	lock  sync.RWMutex
	items map[string]interface{}

	// index implements the indexing functionality
	index *storeIndex
}
参考资料:
- client-go 之 Indexer 的理解
- Client-Go 之 Indexer 原理分析及示例演示
- K8s源码分析(23)-indexer及index和indices组件
- k8s-club/articles/Informer机制 - Indexer.md
- 深入源码分析 kubernetes client-go list-watch 和 informer 机制的实现原理
- 深入理解 Kubernetes 源码 P227
Processor 资源处理
从 DeltaFIFO 中推送的资源对象的操作记录,除了交由 Indexer 存储至本地缓存,还会一并推送给 processor,最终交由 Informer 机制的使用方处理。
Workqueue 工作队列
workqueue 支持 3 种队列,并且提供了 3 种接口,不同队列实现可应对不同的使用场景。
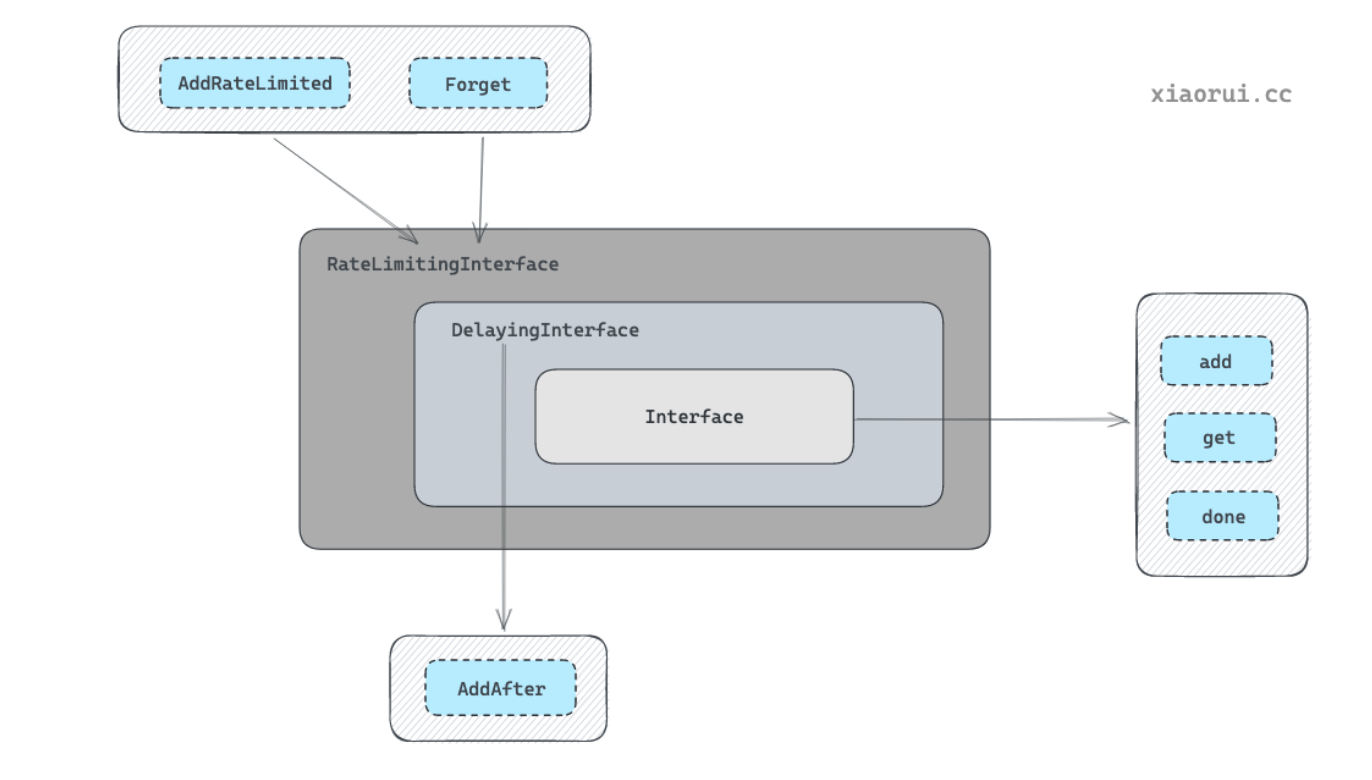
- Interface:FIFO 通用队列接口,先进先出队列,并且支持去重机制。
type Interface interface {
	Add(item interface{})
	Len() int
	Get() (item interface{}, shutdown bool)
	Done(item interface{})
	ShutDown()
	ShutDownWithDrain()
	ShuttingDown() bool
}- DelayingInterface:延迟队列接口,基于 Interface 接口封装,
AddAfter方法允许延迟一段时间后再将元素插入队列。
// DelayingInterface is an Interface that can Add an item at a later time. This makes it easier to
// requeue items after failures without ending up in a hot-loop.
type DelayingInterface interface {
	Interface
	// AddAfter adds an item to the workqueue after the indicated duration has passed
	AddAfter(item interface{}, duration time.Duration)
}- RateLimitingInterface:限速队列接口,基于 DelayingInterface 接口封装,支持在将元素插入队列时进行速率限制。
// RateLimitingInterface is an interface that rate limits items being added to the queue.
type RateLimitingInterface interface {
	DelayingInterface

	// AddRateLimited adds an item to the workqueue after the rate limiter says it's ok
	AddRateLimited(item interface{})

	// Forget indicates that an item is finished being retried.  Doesn't matter whether it's for perm failing
	// or for success, we'll stop the rate limiter from tracking it.  This only clears the `rateLimiter`, you
	// still have to call `Done` on the queue.
	Forget(item interface{})

	// NumRequeues returns back how many times the item was requeued
	NumRequeues(item interface{}) int
}
FIFO 通用队列实现
FIFO 通用队列数据结构中最主要的字段有 queue、dirty、processing,通过这个 dirty 和 processing 两个字段实现了去重的功能。
queue用来实现顺序存储元素的, 其结构为 slice 切片类型, 元素类型为 interface{} 任意类型。queue读写流程为读 slice 的头部, 写 slice 的尾部。queue是 FIFO 先进先出的设计。dirty是用来实现去重的,主要是为了避免重复消费元素。当添加元素时(不管元素是待处理,还是正常被处理),如果dirty中已含有该元素则直接返回。processing也是用来去重的,用于标记一个元素是否正在被处理,其主要是为了避免元素被并发处理。
// Type is a work queue (see the package comment).
type Type struct {
	// queue defines the order in which we will work on items. Every
	// element of queue should be in the dirty set and not in the
	// processing set.
	queue []t

	// dirty defines all of the items that need to be processed.
	dirty set

	// Things that are currently being processed are in the processing set.
	// These things may be simultaneously in the dirty set. When we finish
	// processing something and remove it from this set, we'll check if
	// it's in the dirty set, and if so, add it to the queue.
	processing set

	cond *sync.Cond

	shuttingDown bool
	drain        bool

	metrics queueMetrics

	unfinishedWorkUpdatePeriod time.Duration
	clock                      clock.WithTicker
}
FIFO 通用队列存储过程

例如上图所示为 FIFO 的存储过程,通过 Add 方法向 FIFO 队列中分别插入 1,2,3 这 3 个元素,此时队列中的 queue 和 dirty 字段分别存有 1,2,3 元素,processing 字段为空。
然后通过 Get 方法获取最先进入的元素(元素1),此时队列中的 queue 和 dirty 字段分别存有 2,3;元素 1 被放入 processing 字段中,说明它正在被处理。最后处理完元素 1 时,通过 Done 方法将其标记为处理完成,此时队列中的 processing 字段中的 1 元素被删除。
FIFO 通用队列并发存储过程
但是在并发存储下,如何保证处理一个元素之前哪怕被添加多次,也只是处理一次?下图为 FIFO 并发存储的过程。

在并发场景下,goroutine A 通过 Get 方法获取元素 1,元素 1 被添加到 processing 字段中,同一时间,goroutine B 通过 Add 方法插入另一个 1 元素,此时在 processing 字段中已经存在相同的元素,所以后面后面的元素 1 不会被直接插入到 queue 字段中,而是存入 dirty 字段中;在 goroutine A 通过 Done 方法标记处理完元素 1 后,如果 dirty 字段中存有元素 1,则将其追加到 queue 字段的尾部,dirty 和 processing 字段都是 HashMap 数据结构实现的,不考虑无序,只考虑去重。
FIFO 通用队列主要方法
Add() 是将元素插入到队列的方法。插入元素的流程原理如下:
- 判断
dirty是否存在该元素,如存在则直接跳出,其目的是为了实现待处理元素的去重效果。 - 然后在
dirty里添加元素,再判断processing集合是否存在元素,如果存在则跳出。其目的是为了防止同一个元素被并发处理。 - 在
processing集合里加入元素。 - 使用 cond signal 唤醒其他陷入阻塞的协程。
func (q *Type) Add(item interface{}) {
    // 加锁保证并发安全
    q.cond.L.Lock()
    defer q.cond.L.Unlock()

    // 已关闭直接退出
    if q.shuttingDown {
        return
    }

    // 如果 dirty 已存在,则直接退出,dirty 是为了实现待消费元素的去重。
    if q.dirty.has(item) {
        return
    }

    // 增加 add 的指标
    q.metrics.add(item)

    // 每次 add 的元素也要放到 dirty 集合里,为了去重效果。
    q.dirty.insert(item)

    // 如果这个元素正在处理, 那么在把元素放到 dirty 后就完事了。后面由 Done 方法来处理 dirty -> queue 的逻辑。
    if q.processing.has(item) {
        return
    }

    // 把元素放到队列里
    q.queue = append(q.queue, item)

    // 通知等待的协程处理任务
    q.cond.Signal()
}
Get() 是获取元素的方法,从队列的头部获取最先入队的元素。然后在 processing 集合中添加元素,其目的就是为了防止同一个元素对象被并发处理。最后从 dirty 集合里删除对象,因为 dirty 是为了实现的待消费去重,既然从 queue 拿走元素,dirty 也需要删除。
func (q *Type) Get() (item interface{}, shutdown bool) {
    // 线程安全
    q.cond.L.Lock()
    defer q.cond.L.Unlock()

    // 如果队列为空则陷入 cond 等待
    for len(q.queue) == 0 && !q.shuttingDown {
        q.cond.Wait()
    }

    // 如果关闭了且队列为空,直接 return
    if len(q.queue) == 0 {
        return nil, true
    }

    // 从头部获取元素
    item = q.queue[0]
    q.queue[0] = nil

    // 重新引用切片
    q.queue = q.queue[1:]

    // 统计 metrics get 指标
    q.metrics.get(item)

    // 从 dirty set 里去除,加到 processing 集合里
    q.processing.insert(item)
    q.dirty.delete(item)

    return item, false
}
Done() 用来标记某元素已经处理完,可以从 processing 集合中去除,然后判断 dirty 集合中是否有该对象,如果存在则把该对象推到 queue 里再次入队。
如果一个元素正在被处理,这时候如果再次添加同一个元素,由于该元素还在处理未完成,只能把对象放到 dirty 里。为什么不放到 queue 里?因为放 queue 里的话,在并发消费场景下,同一个元素会被多个协程并发处理。当执行完毕调用 Done() 时,会把 dirty 的任务重新入队,起到了排队的效果。
func (q *Type) Done(item interface{}) {
    // 线程安全
    q.cond.L.Lock()
    defer q.cond.L.Unlock()

    // 统计 metrics done 指标
    q.metrics.done(item)

    // 从 processing 集合中剔除
    q.processing.delete(item)

    // 如果 dirty 还有,那么把该元素加到 queue 队列里
    if q.dirty.has(item) {
        q.queue = append(q.queue, item)
        q.cond.Signal()
    } else if q.processing.len() == 0 {
        q.cond.Signal()
    }
}
FIFO 通用队列的使用示例可以在这里找到:workqueue.go
延迟队列
延迟队列是基于 FIFO 队列接口封装的,在原有功能上增加了 AddAfter 方法,其原理是延迟一段时间后再将元素插入 FIFO 队列。
// delayingType wraps an Interface and provides delayed re-enquing
type delayingType struct {
	Interface

	// clock tracks time for delayed firing
	clock clock.Clock

	// stopCh lets us signal a shutdown to the waiting loop
	stopCh chan struct{}
	// stopOnce guarantees we only signal shutdown a single time
	stopOnce sync.Once

	// heartbeat ensures we wait no more than maxWait before firing
	heartbeat clock.Ticker

	// waitingForAddCh is a buffered channel that feeds waitingForAdd
	waitingForAddCh chan *waitFor

	// metrics counts the number of retries
	metrics retryMetrics
}
delayingType 结构中最主要的字段是 waitingForAddCh,其默认初始大小为 1000,在通过 AddAfter 方法插入元素时,是非阻塞状态的,只有当插入的元素大于或等于 1000 时,延迟队列才会处于阻塞状态。waitingForAddCh 字段中的数据通过 goroutine 运行的 waitingLoop 函数持久运行。
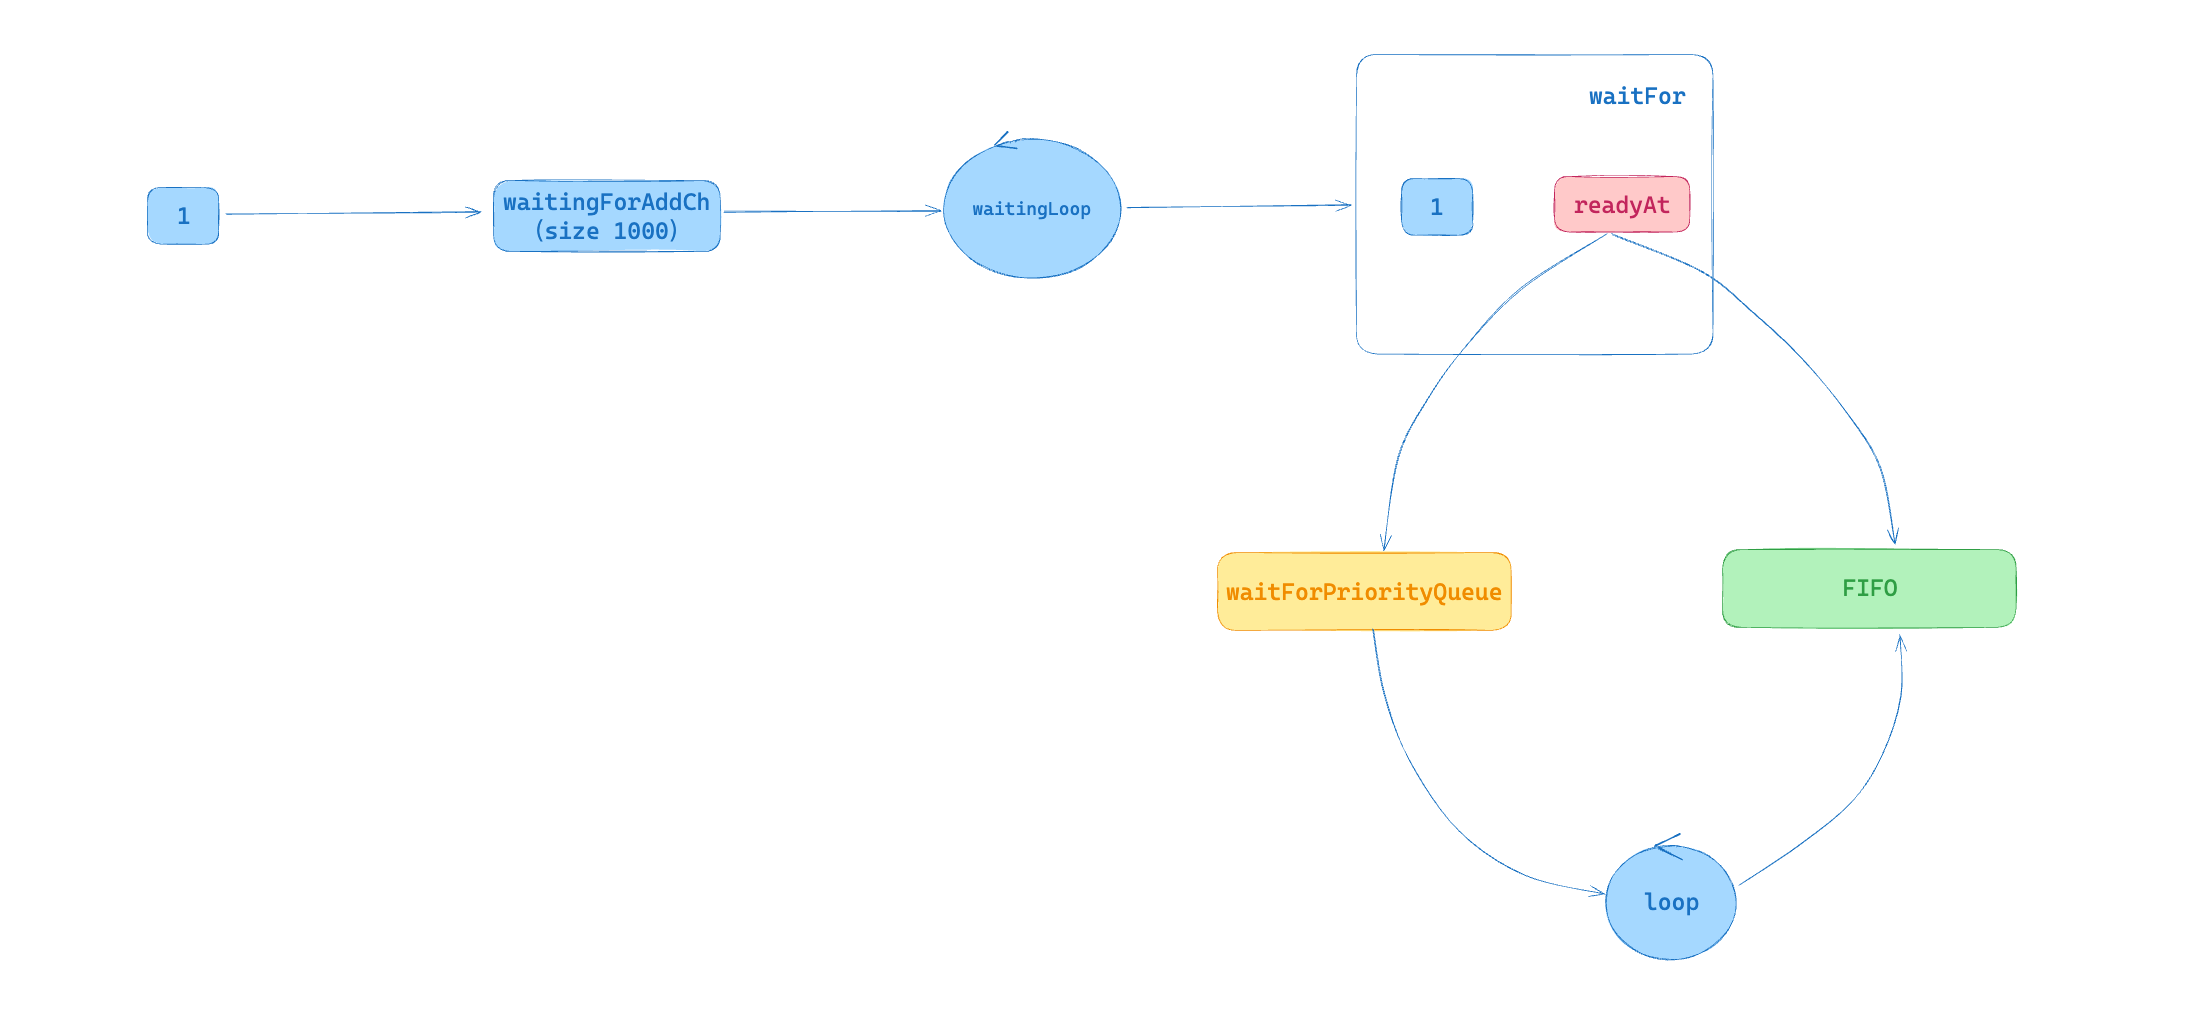
如上图所示,将元素 1 插入 waitingForAddCh 字段中,通过 waitingLoop 函数消费元素数据。当元素的处理时间 readyAt 大于当前时间,说明需要延迟将元素插入 FIFO 通用队列,此时将该元素放入优先队列(waitForPriorityQueue)中。当元素处理时间小于或等于当前时间时,说明该元素需要立即处理,此时将元素直接插入 FIFO 通用队列。此外,waitingLoop 函数还会不断遍历优先队列中的元素,将已经达到处理时间的元素插入 FIFO 通用队列。
延迟队列的使用示例可以在这里找到:delayworkqueue.go
限速队列
限速对列是基于延迟队列和 FIFO 队列接口封装,限速队列接口(RateLimitingInterface)在原有功能上增加了 AddRateLimited、Forget、NumRequeues 方法。
// RateLimitingInterface is an interface that rate limits items being added to the queue.
type RateLimitingInterface interface {
	DelayingInterface

	// AddRateLimited adds an item to the workqueue after the rate limiter says it's ok
	AddRateLimited(item interface{})

	// Forget indicates that an item is finished being retried.  Doesn't matter whether it's for perm failing
	// or for success, we'll stop the rate limiter from tracking it.  This only clears the `rateLimiter`, you
	// still have to call `Done` on the queue.
	Forget(item interface{})

	// NumRequeues returns back how many times the item was requeued
	NumRequeues(item interface{}) int
}
在创建限速队列时,可以传入不同的限速器 RateLimiter 实现,官方提供 4 种限速器,分别应对不同的场景,包括令牌桶算法(BucketRateLimiter)、排队指数算法(ItemExponentialFailureRateLimiter)、计数器算法(ItemFastSlowRateLimiter)和混合算法(MaxOfRateLimiter)。
type RateLimiter interface {
	// When gets an item and gets to decide how long that item should wait
	When(item interface{}) time.Duration
	// Forget indicates that an item is finished being retried.  Doesn't matter whether it's for failing
	// or for success, we'll stop tracking it
	Forget(item interface{})
	// NumRequeues returns back how many failures the item has had
	NumRequeues(item interface{}) int
}
其中 MaxOfRateLimiter 实例化时可以传入多个 RateLimiter 限速器实例,使用 When() 求等待间隔时,然后选择最大的等待间隔。
// 我们定义了一个复合的限速器,它结合了两种限速策略:
// 1. 使用指数退避的限速器,用于限制每个任务的重试频率
// 2. 使用令牌桶算法限制总体速率,这里设置为每秒 5 个请求。
// MaxOfRateLimiter 会遍历所有的 RateLimiter 示例,使用 When() 计算等待间隔,然后选择最大的等待间隔。
limiter := workqueue.NewMaxOfRateLimiter(
    workqueue.NewItemExponentialFailureRateLimiter(time.Millisecond, 1000*time.Millisecond),
    &workqueue.BucketRateLimiter{Limiter: rate.NewLimiter(rate.Limit(5), 5)},
)限速队列的使用示例可以在这里找到:ratelimitworkqueue.go
- 源码分析 kubernetes client-go workqueue 的实现原理
- 深入理解 Kubernetes 源码 P233 ~ P240
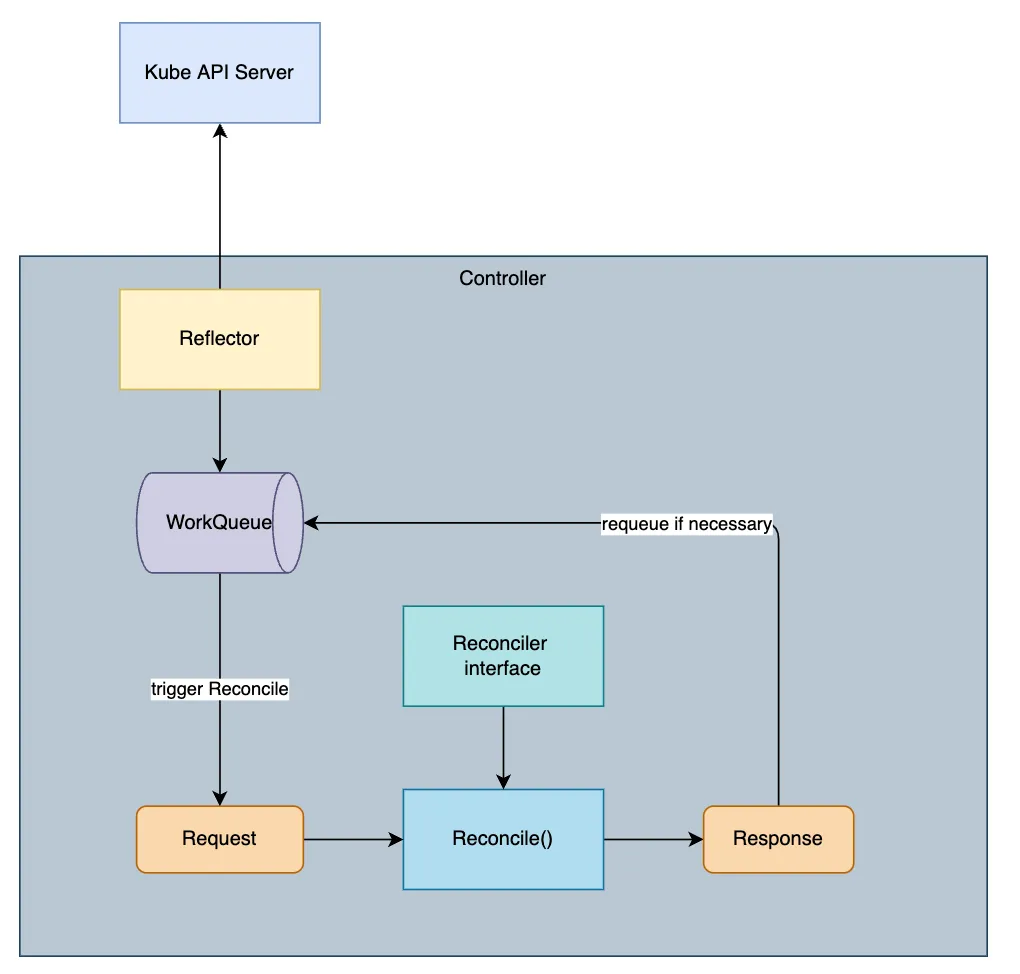
为什么 Controller 不直接从 Informer 中获取资源对象进行处理,而是从 Workqueue 中获取对象的 objKey 进行处理?
因为每个 obj 在 Kubernetes 各组件内经过 Reconcile,obj 随时都在进行变化。Informer 中对象是以 key-accumulator 方式存储,即一个 obj 随着时间的变化存在很多版本,通过取 key 间接取到最新的 obj,保证了取到的 obj 是实时最新的对象。
另外,为什么在 Controller 内使用 WorkQueue,还有以下两点考虑:
- 避免 OOM。具体来说,是提升 Controller(Listener) 处理(接收)事件的速率,(直接放入WorkQueue,比完成复杂的 Reconcile 流程要快很多很多),这样就能避免 Informer 框架内的 processorListener 在向当前这个 Listener/Controller 派发事件时,向 pendingNotifications 中堆积过多事件,从而引发 OOM。
- 减少 Reconcile 次数,避免多次无意义的 Reconcile。通过 WorkQueue 内部的实现机制,能够保证在处理一个 obj 之前哪怕其被添加了多次(在短时间内大量到来等),也只会被处理一次,极大的减少了 Reconcile 的次数。同时每次 Reconcile 从 Indexer 中取最新的 obj,而不是直接使用被通知的 obj,能够避免无意义的 Reconcile。
Resync 机制的作用是什么?
resync 的目的是为了让 listener 能够定期 reconcile Indexer 内的所有事件,来保证对应事件关心的对象(可能是系统内,也可能是系统外)状态都是预期状态。如果此时 reconcile 过程中发现对象状态不是预期状态,就会驱动其向预期状态发展。
一个易理解的例子:我们实现了一个 listener,其会通过对象描述的磁盘规格(大小,类型等等)来向云服务商购买对应的磁盘。对于对象 A 而言,listener 在第一次 reconcile 对象 A 时,通过调用云服务商的接口,购买了其对应规格的磁盘,并在购买完成之后,在对象 A 的 status 中添加上了购买完成的信息,之后本轮 reconcile 就结束了。之后,用户通过云服务商控制台将磁盘误删除了,但是此时 listener 是感知不到这个操作的,并且对象 A 的 status 中一直维持着购买成功的信息,这可能会导致依赖这个 status 的程序出现意外的错误。在这种场景下,通过 resync 功能,在 listener 的同步时间到达之后,就会重新处理对象 A,此时 listener 发现控制台上并没有该磁盘,就会重新调用接口再创建一次,这样就将用户在控制台误删除的动作给修正了)
参考资料:
使用 Informer,Controller runtime 和 Kubebuilder 来编写 Controller 的区别
直接使用 Informer:直接使用 Informer 编写 Controller 需要编写更多的代码,因为我们需要在代码处理更多的底层细节,例如如何在集群中监视资源,以及如何处理资源变化的通知。但是,使用 Informer 也可以更加自定义和灵活,因为我们可以更细粒度地控制 Controller 的行为。
Controller runtime:Controller runtime 是基于 Informer 实现的,在 Informer 之上为 Controller 编写提供了高级别的抽象和帮助类,包括 Leader Election、Event Handling 和 Reconcile Loop 等等。使用 Controller runtime,可以更容易地编写和测试 Controller,因为它已经处理了许多底层的细节。
Kubebuilder:和 Informer 及 Controller runtime 不同,Kubebuilder 并不是一个代码库,而是一个开发框架。Kubebuilder 底层使用了 controller-runtime。Kubebuilder 提供了 CRD 生成器和代码生成器等工具,可以帮助开发者自动生成一些重复性的代码和资源定义,提高开发效率。同时,Kubebuilder 还可以生成 Webhooks,以用于验证自定义资源。
参考资料:Kubernetes Controller 机制详解(一):Kubernetes API List/Watch 机制 与 Informer 客户端库
Controller-Runtime
Controller-Runtime 的使用方法
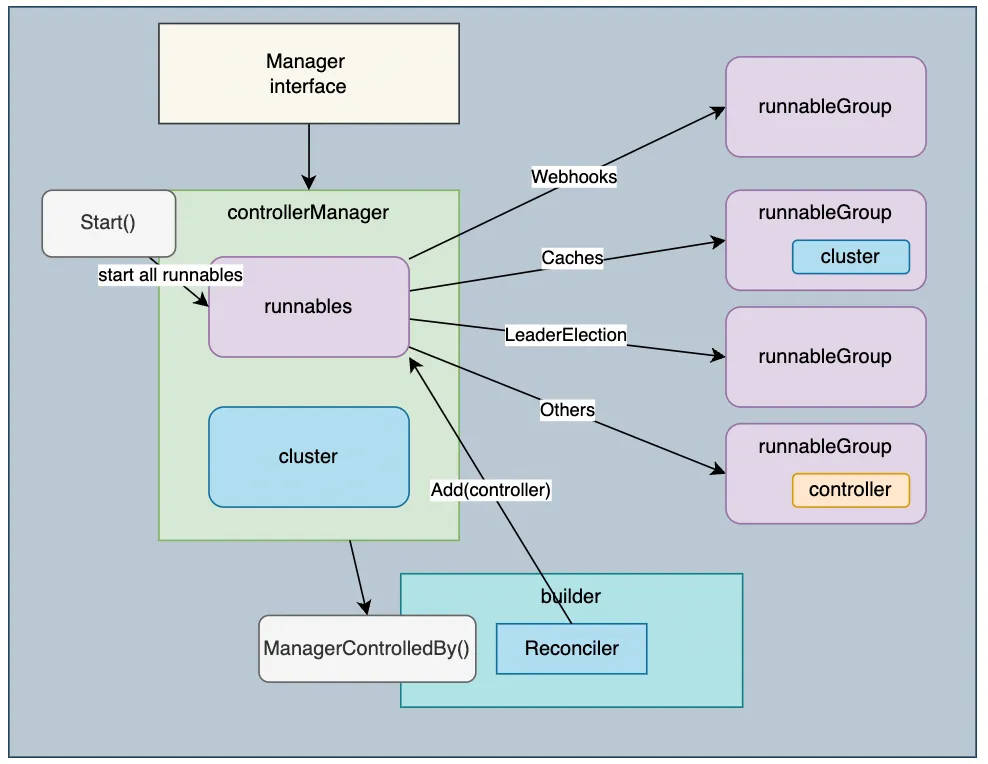
controller-runtime 的使用主要分为以下几个步骤:
- 1.使用
NewManager方法创建 Manager,Manager 主要用来启动 Controller、管理 Controller 依赖、提供集群相关资源的获取方式等。 - 2.通过
NewControllerManagedBy(mgr)方法实例化一个 Builder 对象,其中传入的 Manager 提供创建 Controller 所需的依赖。 - 3.使用
For方法用来指定需要 Watch 的资源类型;有时候也会用到Owns方法,表示某资源是我关心资源的从属,其 event 也会进去 Controller 的队列中;Complete方法传入用户实现 Reconciler 接口的一个对象,controller-runtime 会生成相应 Controller,将用户的 Reconciler 注册进 Controller,并生成 watch 资源的默认 eventHandler,同时执行 Controller 的 watch 函数; - 4.用户的 Reconciler 需要实现 reconcile.Reconciler 接口。
- 5.使用
Start方法启动 Manager,这一步中会同时启动 Cache,即启动 Informer,以及启动 Controller。
package main

import (
	"context"
	"fmt"
	api "github.com/zhaohuabing/k8scontrollertutorial/pkg/custom/apis/foo/v1alpha1"
	_ "k8s.io/client-go/plugin/pkg/client/auth/gcp"
	"os"
	ctrl "sigs.k8s.io/controller-runtime"
	"sigs.k8s.io/controller-runtime/pkg/client"
	"sigs.k8s.io/controller-runtime/pkg/log"
	"sigs.k8s.io/controller-runtime/pkg/log/zap"
)

var (
	setupLog = ctrl.Log.WithName("setup")
)

type reconciler struct {
	client.Client
}
// 对 foo 进行调谐的方法
func (r *reconciler) Reconcile(ctx context.Context, req ctrl.Request) (ctrl.Result, error) {
	log := log.FromContext(ctx).WithValues("foo", req.NamespacedName)
	log.V(1).Info("reconciling foo")

	var foo api.Foo
	if err := r.Get(ctx, req.NamespacedName, &foo); err != nil {
		log.Error(err, "unable to get foo")
		return ctrl.Result{}, err
	}

	fmt.Printf("Sync/Add/Update for foo %s\n", foo.GetName())
	return ctrl.Result{}, nil
}

func main() {
	ctrl.SetLogger(zap.New())
	// 创建 Manager,创建时设置 Leader Election 相关的参数
	mgr, err := ctrl.NewManager(ctrl.GetConfigOrDie(), ctrl.Options{
		LeaderElection:          true,
		LeaderElectionID:        "sample-controller",
		LeaderElectionNamespace: "kube-system",
	})
	if err != nil {
		setupLog.Error(err, "unable to start manager")
		os.Exit(1)
	}

	// in a real controller, we'd create a new scheme for this
	err = api.AddToScheme(mgr.GetScheme())
	if err != nil {
		setupLog.Error(err, "unable to add scheme")
		os.Exit(1)
	}
    // 创建对 foo 进行调谐的 controller
	err = ctrl.NewControllerManagedBy(mgr).
		For(&api.Foo{}).
		Complete(&reconciler{
			Client: mgr.GetClient(),
		})
	if err != nil {
		setupLog.Error(err, "unable to create controller")
		os.Exit(1)
	}
    // 创建用于校验 foo 的 webhook
	err = ctrl.NewWebhookManagedBy(mgr).
		For(&api.Foo{}).
		Complete()
	if err != nil {
		setupLog.Error(err, "unable to create webhook")
		os.Exit(1)
	}
	// 启动 Manager,Manager 将启动其管理的所有 controller 以及 webhook server
	setupLog.Info("starting manager")
	if err := mgr.Start(ctrl.SetupSignalHandler()); err != nil {
		setupLog.Error(err, "problem running manager")
		os.Exit(1)
	}
}
参考资料:
- Kubernetes Controller 机制详解(二)
- k8s operator开发进阶之controller-runtime源码分析
- 一文读懂 K8s controller-runtime
- Develop on Kubernetes Series — Demystifying the For vs Owns vs Watches controller-builders in controller-runtime
Controller-Runtime 的整体架构

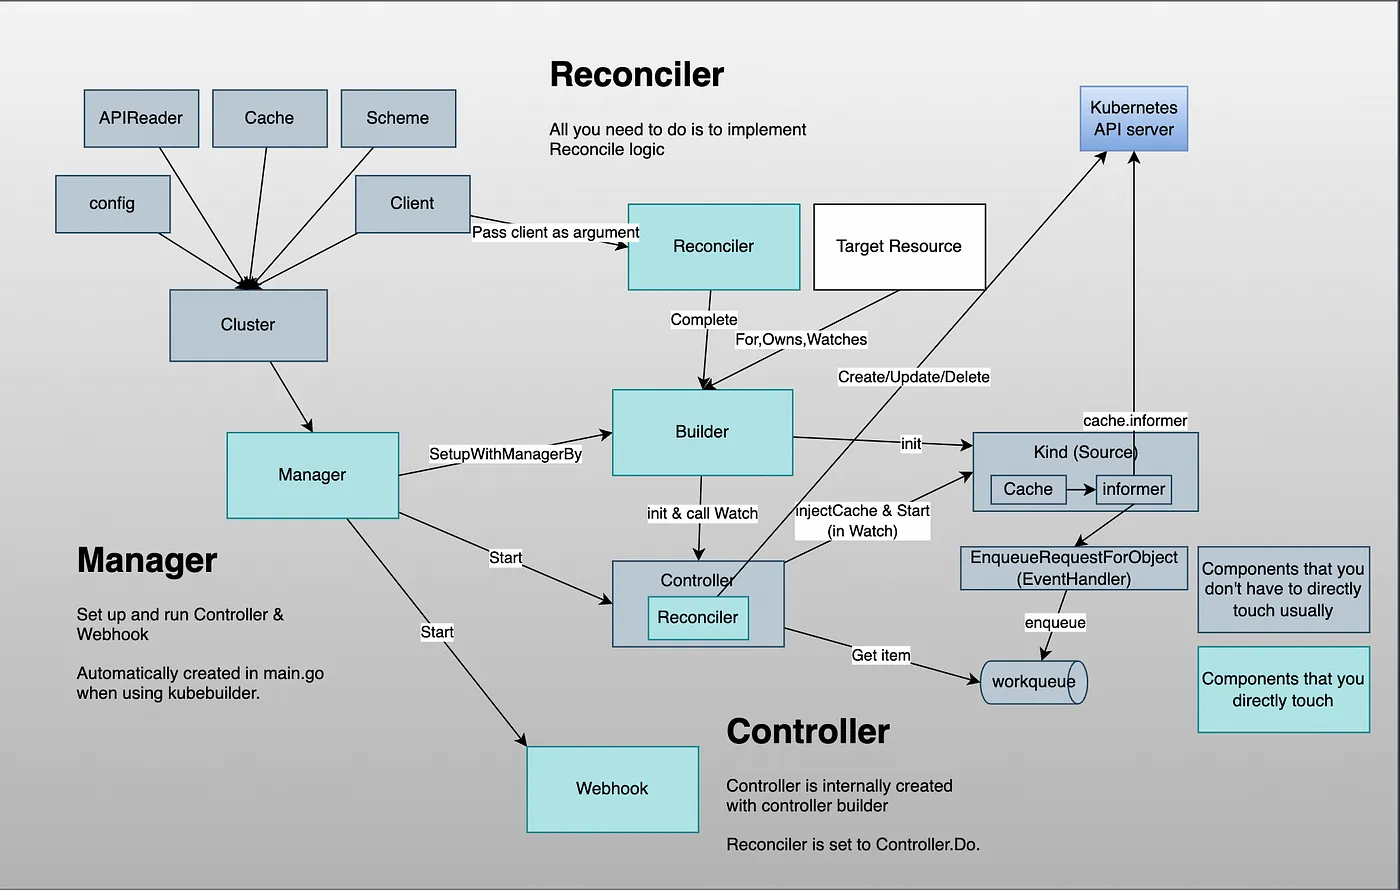
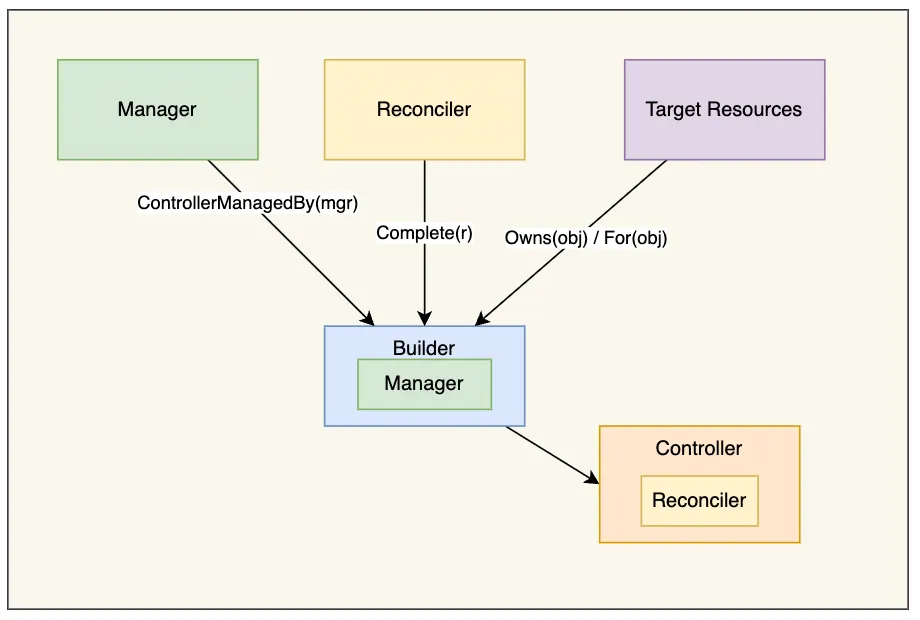
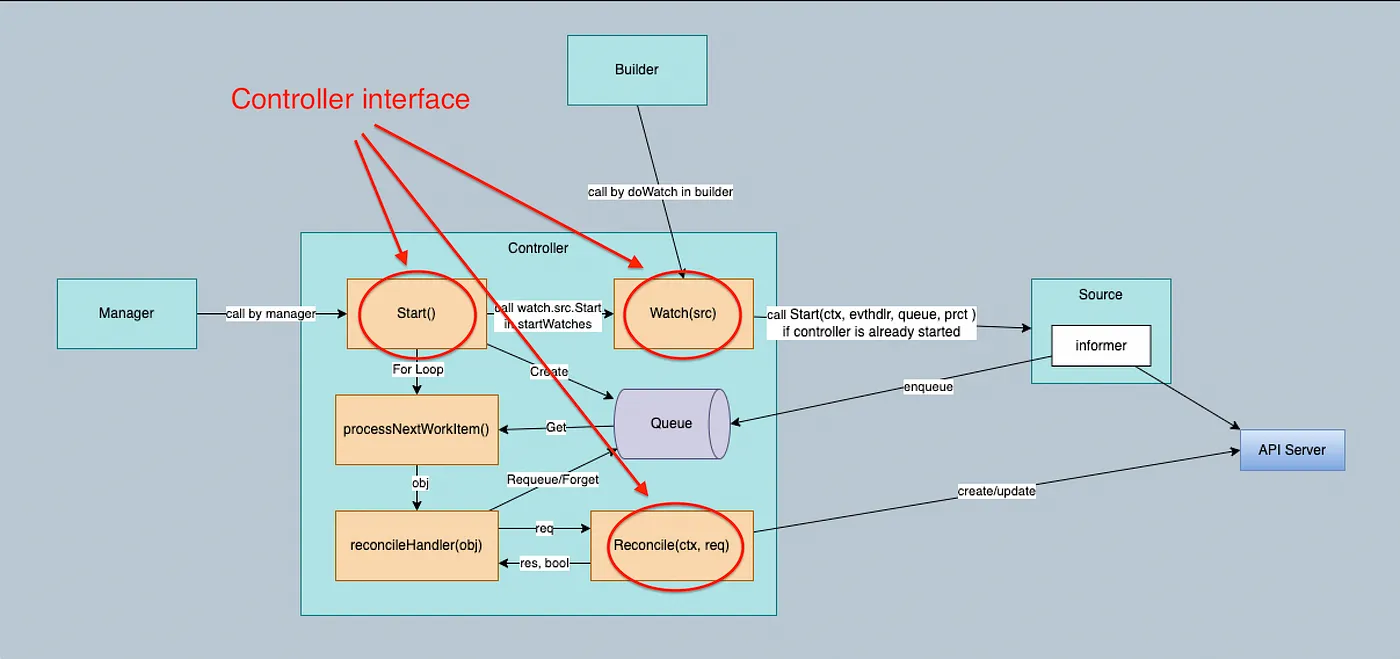
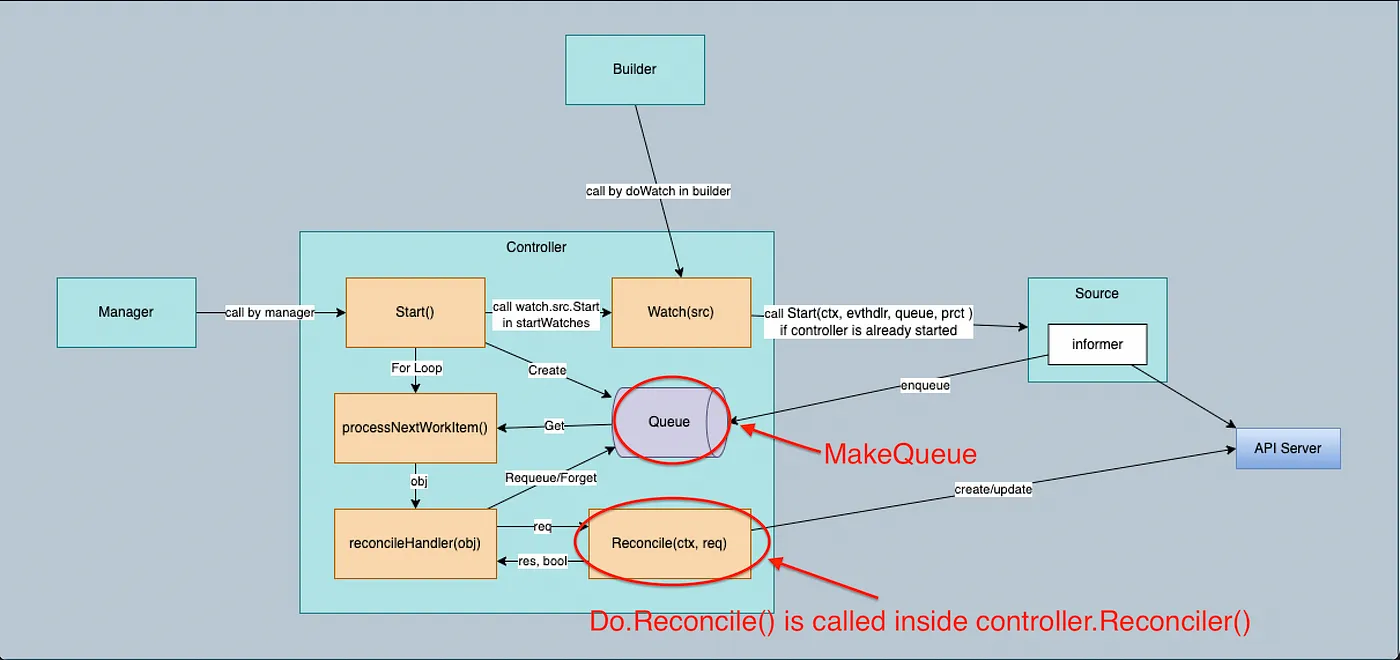

Builder 创建 Controller 时,会根据 Build.For()、Build.Owns()、Build.Watches() 方法中设置的资源对象类型在 Builder.Build() 中创建相应的 Kind,并调用 Controller.Watch() 方法将 Kind 传入 Controller。
Watch 从 Source 获取事件,并使用 Predicates 处理接收到的事件以进行过滤,并使用 EventHandler 将它们放入队列中。
参考资料: